

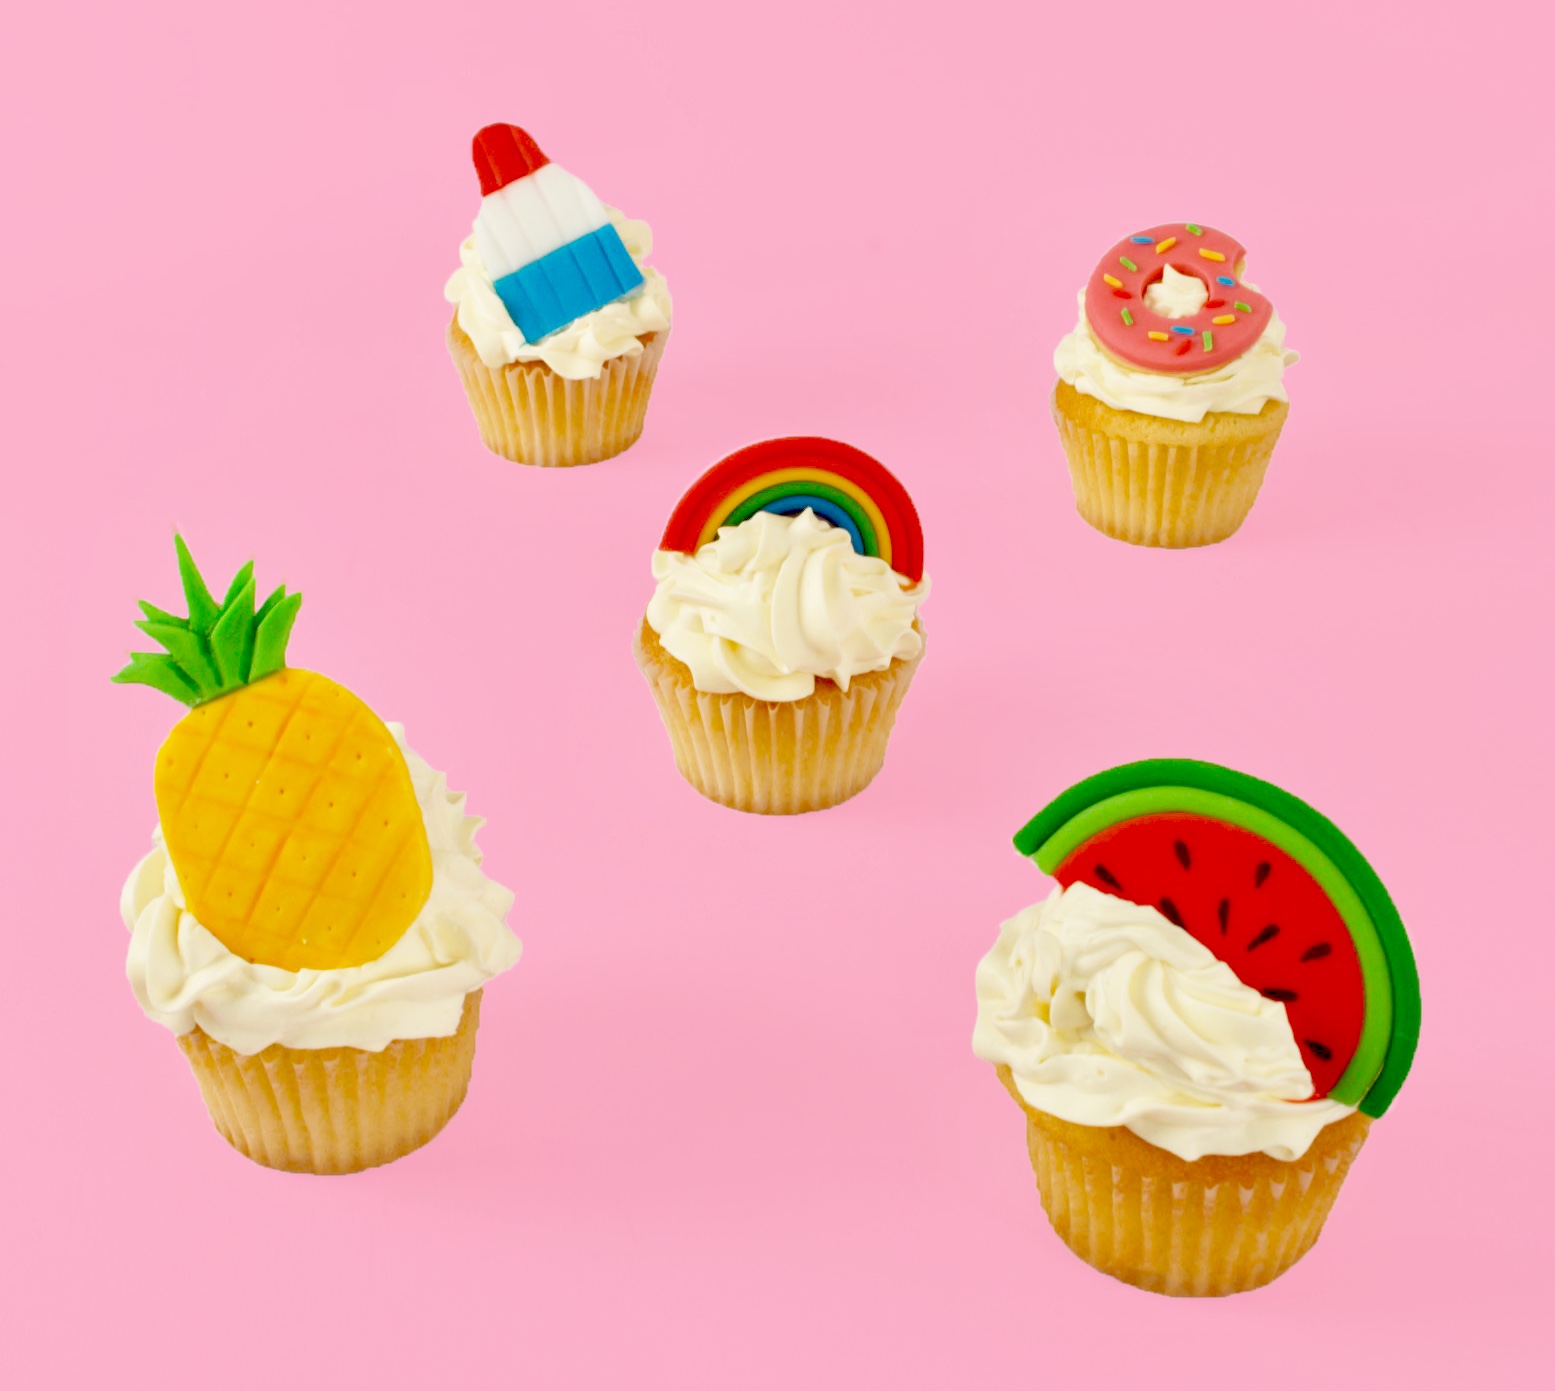
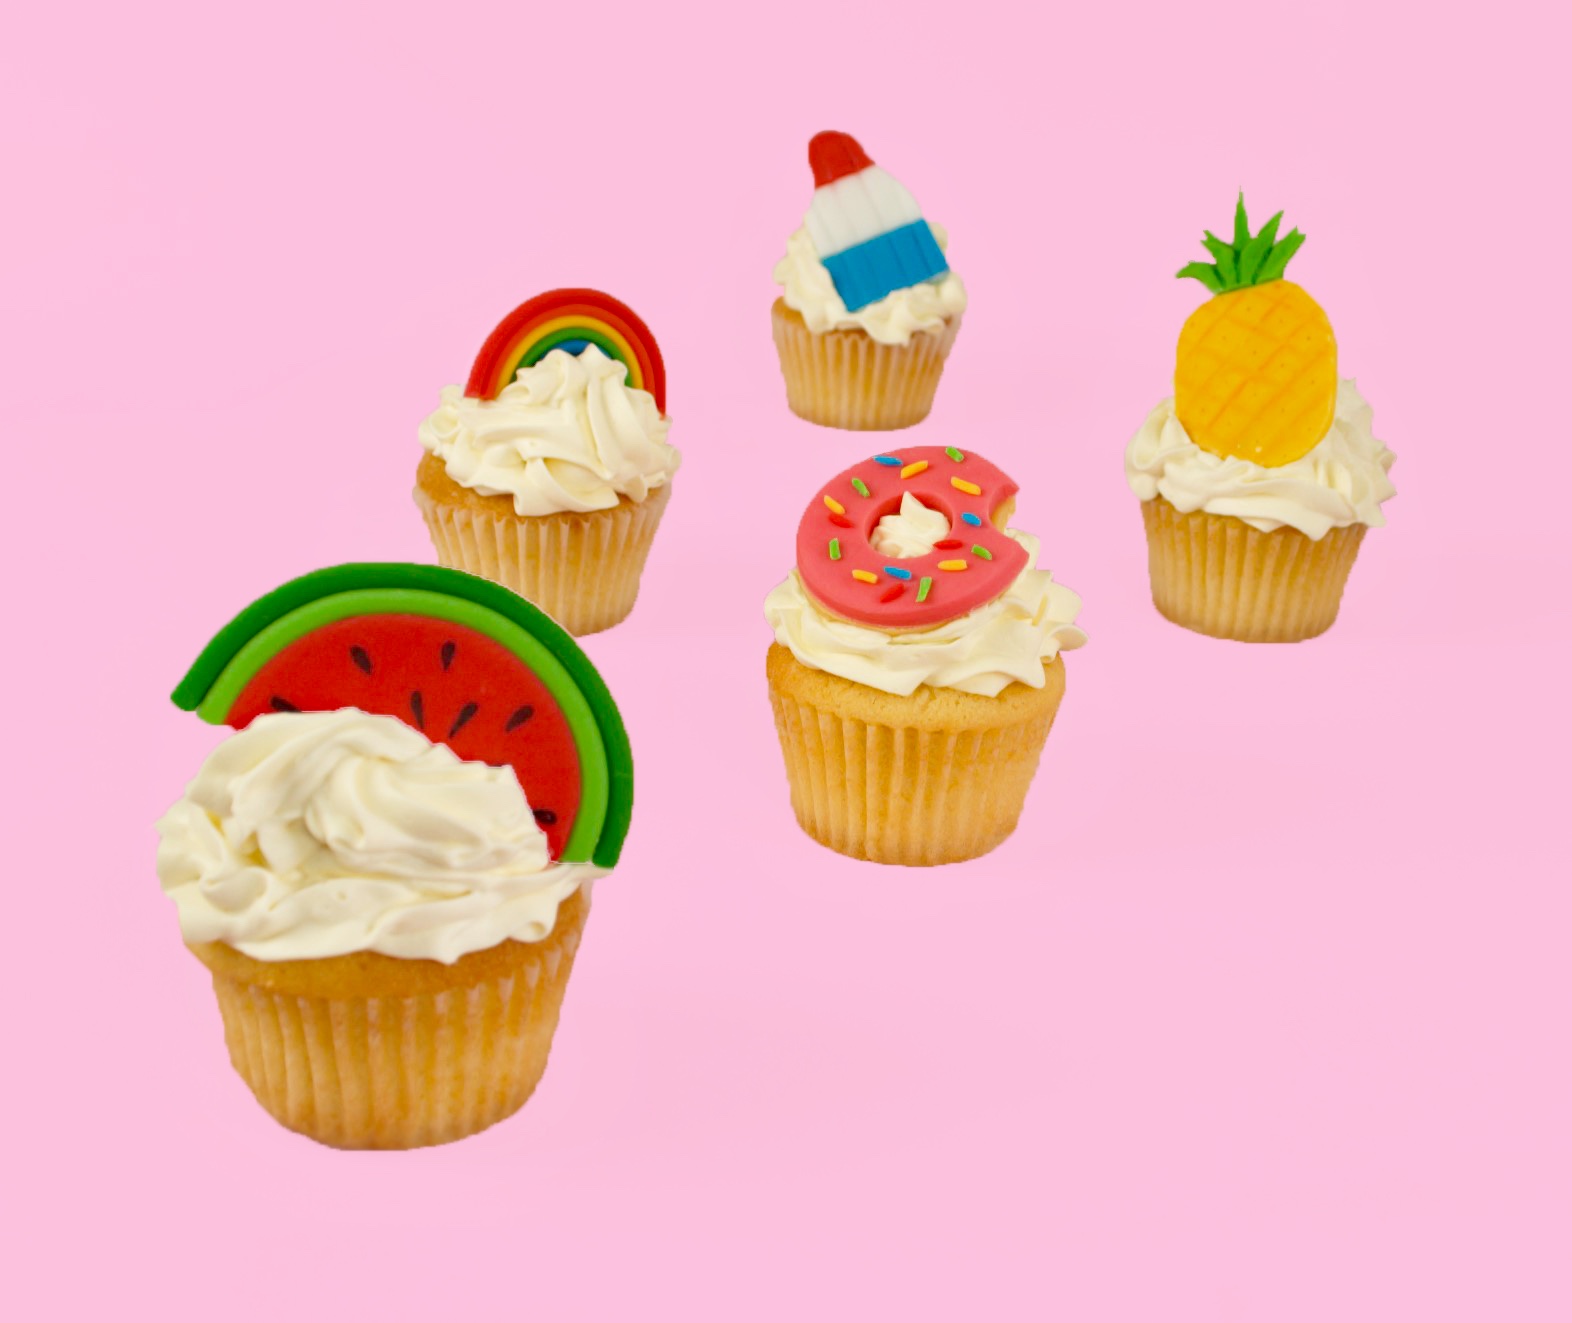
DIY Summer Fun Cupcake Toppers
Hey hey hey! Ok, so although these are for sure summer fun cupcake toppers they were all completely and utterly inspired by my one true love… Love Island! I can’t help it, I can’t help it, I’m a reality TV junkie and this ticks all my boxes. It’s got ridiculously fast relationship-ing, a superbly sarcastic Scot doing the narrating (marry me already Iain Stirling!) and Caroline Flack who I wish would be my bff already. I LOVE IT!
If you watch the show, I’m sure you recognise the toppers as the pictures that hang above the beds in the villa. Cos Love Island is always super on trend and I am loving the styling this year! I haven’t ordered a water bottle yet but let’s just say my finger has been hovering over the confirm purchase button more than I’d care to admit. Side note, there isn’t enough money in the world to get me to share a bedroom with 11 other folk. I did it once in a hostel in Mexico and despite my surprising friendship with the 72-year-old man in the bed next to mine I’m still well and truly scarred!


My favourite bit about these (other than the Love Island ref, obvs) is how easy they were to make. Honestly, a total doddle and cos they’re fondant you can make them up to a month in advance and just keep them stored in a cardboard box for when you need them. There’s 5 designs here but if you only need one, I’ve split them into 5 sets of instructions and you can jump ahead to whichever suits your party. My sister made the rainbow toppers last week and they turned out stunning! It was her first time using fondant and she totally nailed it, she was the absolute belle of her office bake sale.


Things worth noting:
- If at any point your fondant gets a little sticky, dust it lightly with cornflour.
- It's best to let them dry overnight on parchment paper so I try to assemble them there too. This helps avoid accidentally misshaping them as you move them.
- It's really useful to roll your fondant on parchment paper, it stops it sticking to the surface and the toppers are all small enough that you don’t need to roll large sections at once.
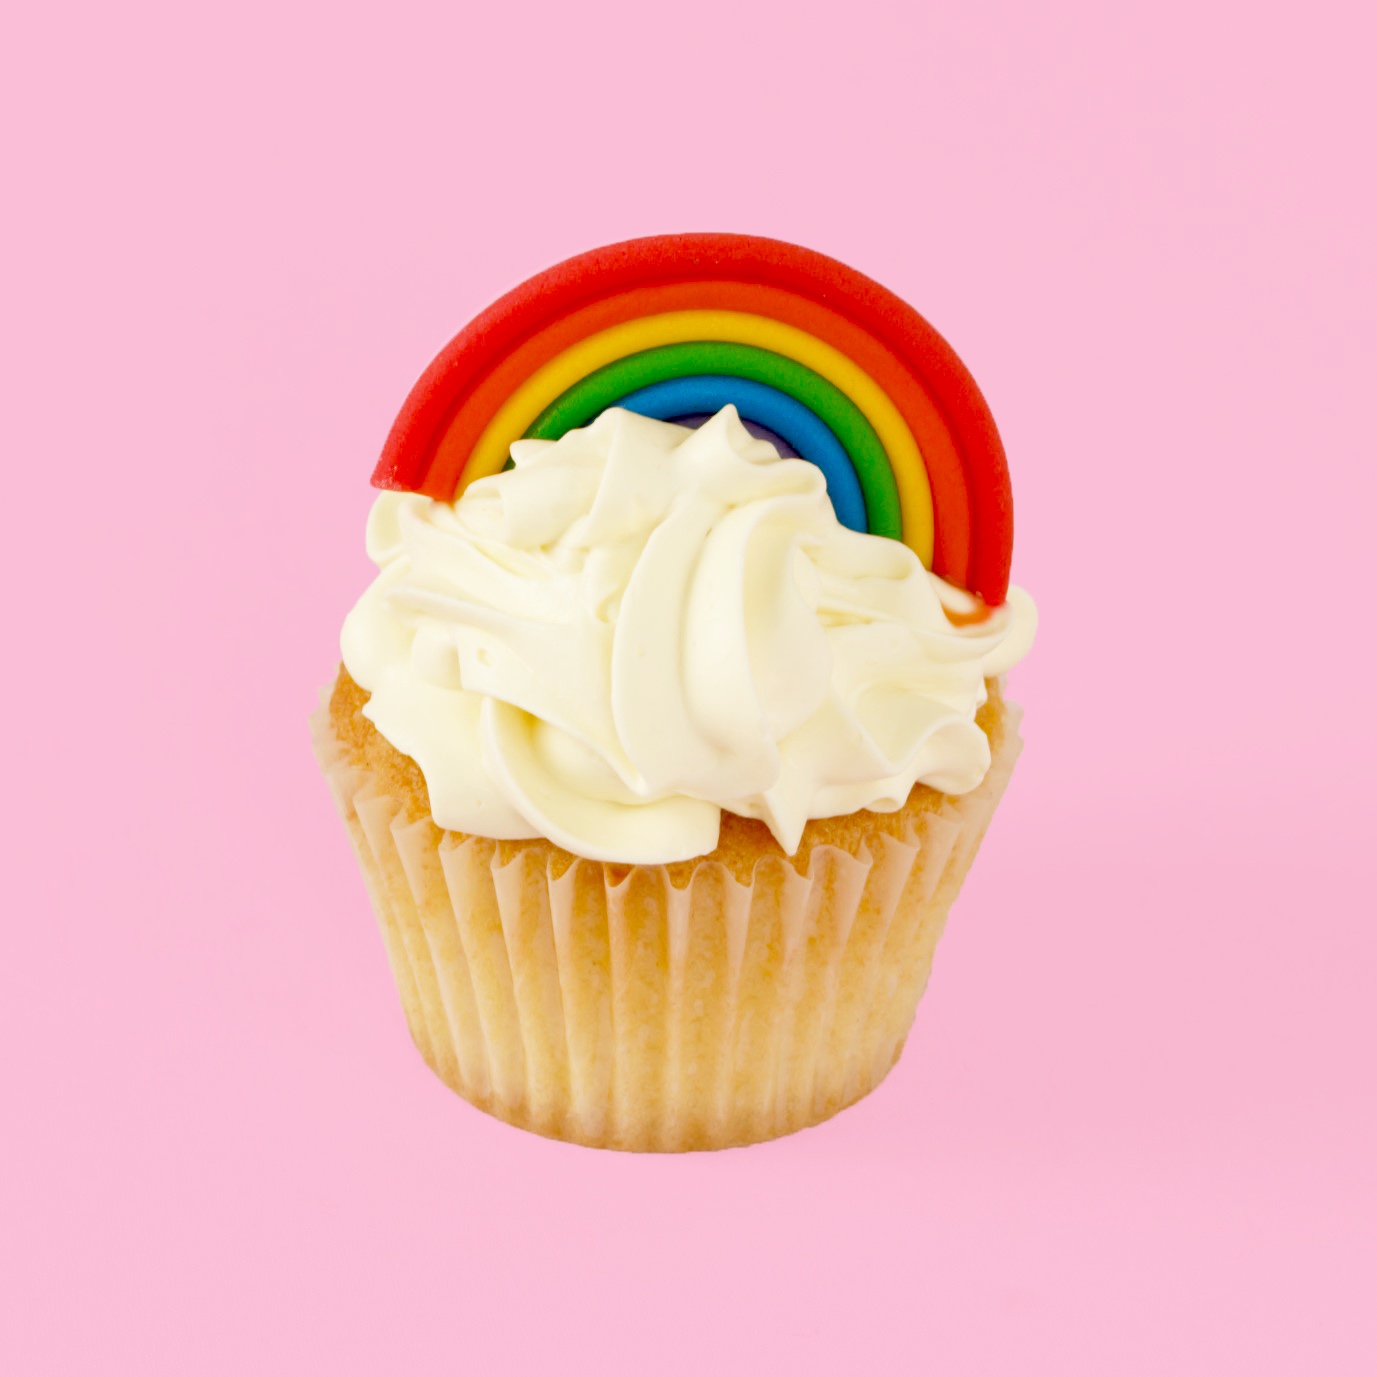
Rainbow Cupcake Toppers
Makes 12
You will need
100g each of red, orange, yellow, green, blue and purple fondant
100g of white fondant
1 small piping nozzle
1 small round cookie cutter
1 food-only paintbrush
Instructions
1. Pinch off a small piece each of red, orange, yellow, green, blue and purple fondant.
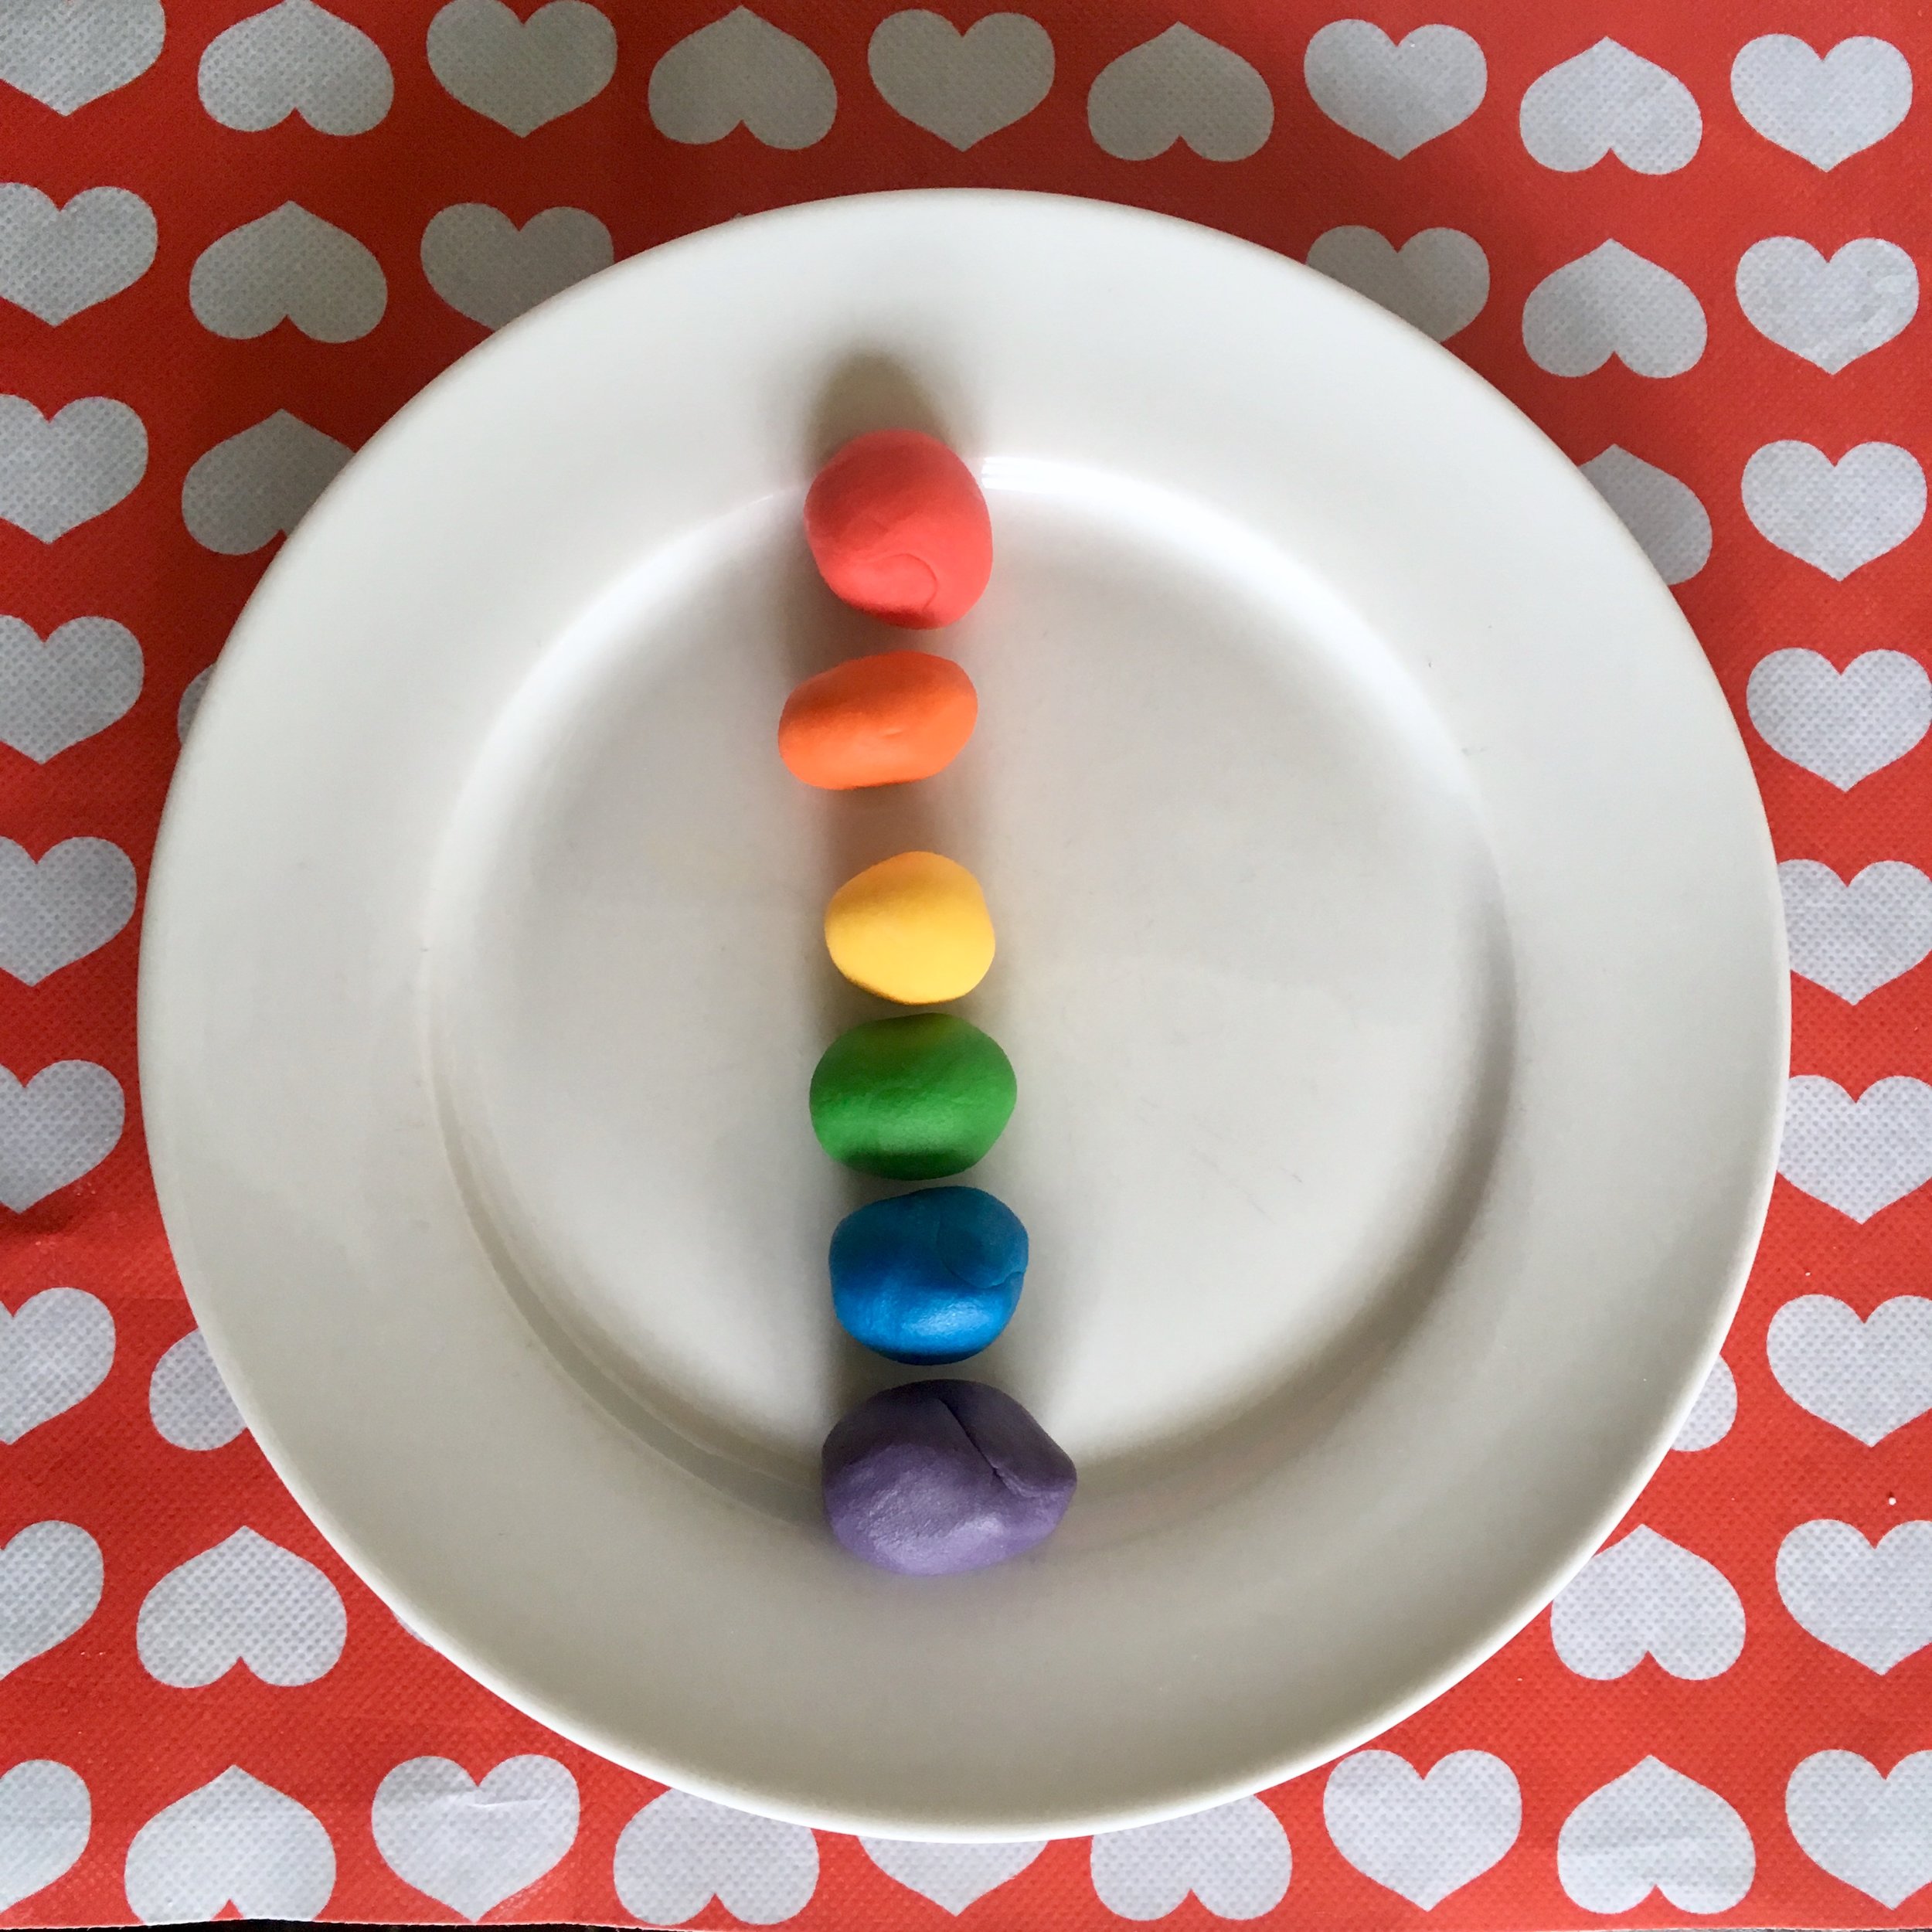
2. Roll each piece into really skinny ropes. I find I get the best finish if I roll them under my fondant smoother, it keeps it more even than if I use just my fingers.

3. When all six colours have been rolled into ropes line them up, one under the other in rainbow order.
4. Place a small piping tip against the purple rope and use your fingers to gently curve all the fondant around it. A light dusting of cornflour on the nozzle will stop it sticking.

5. If your fondant is sticky at this point, give it a little dust of cornflour to stop it catching to each other before you’re ready.
6. To attach all the colours to each other, there’s two options. You can use a paintbrush to apply a little water between each of the joins and gently press in from the outside. I liked this method and they all stayed together but it felt a little too fragile for my sensibilities. I am not a wild one.
7. If you’re like me, after you wet the joins you can cut a circle of white fondant using a cookie cutter that’s slightly smaller than your rainbow.


8. Cut the circle in half then attach it on top of the rainbow with a little water. This is like a little fondant insurance policy. Once they’re on the cupcakes, you won’t be able to see the little bit of white on the bottom.
9. Carefully flip them over rainbow side up and trim the excess from the bottom with a very sharp knife.
10. Move the rainbows to a tray lined with parchment paper and leave to dry overnight. At some point during the drying process, flip the toppers so the rainbow is face down to help them dry all the way through.
11. When they’ve completely dried you can go ahead and pop them on your cupcakes.
Watermelon Cupcake Toppers

Makes 12
You will need
150g red fondant
50g dark green fondant
50g light green fondant
1 edible black pen (or black gel food colouring)
1 small round cookie cutter
1 food only paintbrush
Instructions
1. Roll out the red fondant until its 2mm thick.
2. Use a small cookie cutter to cut out 6 circles.
3. With a sharp knife, cut the red circles in half.

4. Pinch off a small piece of dark green fondant and roll it into a skinny rope. It’s best to use a fondant smoother for this to keep it even all the way across. It should be long enough to fit around the rounded edge of one of the half circles.
5. Repeat this process with a small piece of light green fondant.
6. Line up the 2 green ropes around the red half-circle on top of a tray lined with parchment paper.

7. Dampen all the joins with a little water on a food only paintbrush. If you’d like a little extra sticking powder you can mix a spot of tylose powder into the water, but I didn’t and they all stayed whole with no trouble.

8. Trim off the excess and repeat for the other 11 toppers.
9. Leave to dry overnight. If possible, gently flip the watermelons over during the drying process to help it along a little.
10. When dry, use an edible black pen to draw on the watermelon seeds. If you don’t have an edible black pen you could do this part with some black gel food colouring and a fine tipped food only paintbrush.

11. And you’re done, go ahead and pop them on top of an awesome cupcake, careful not to smudge the seeds.
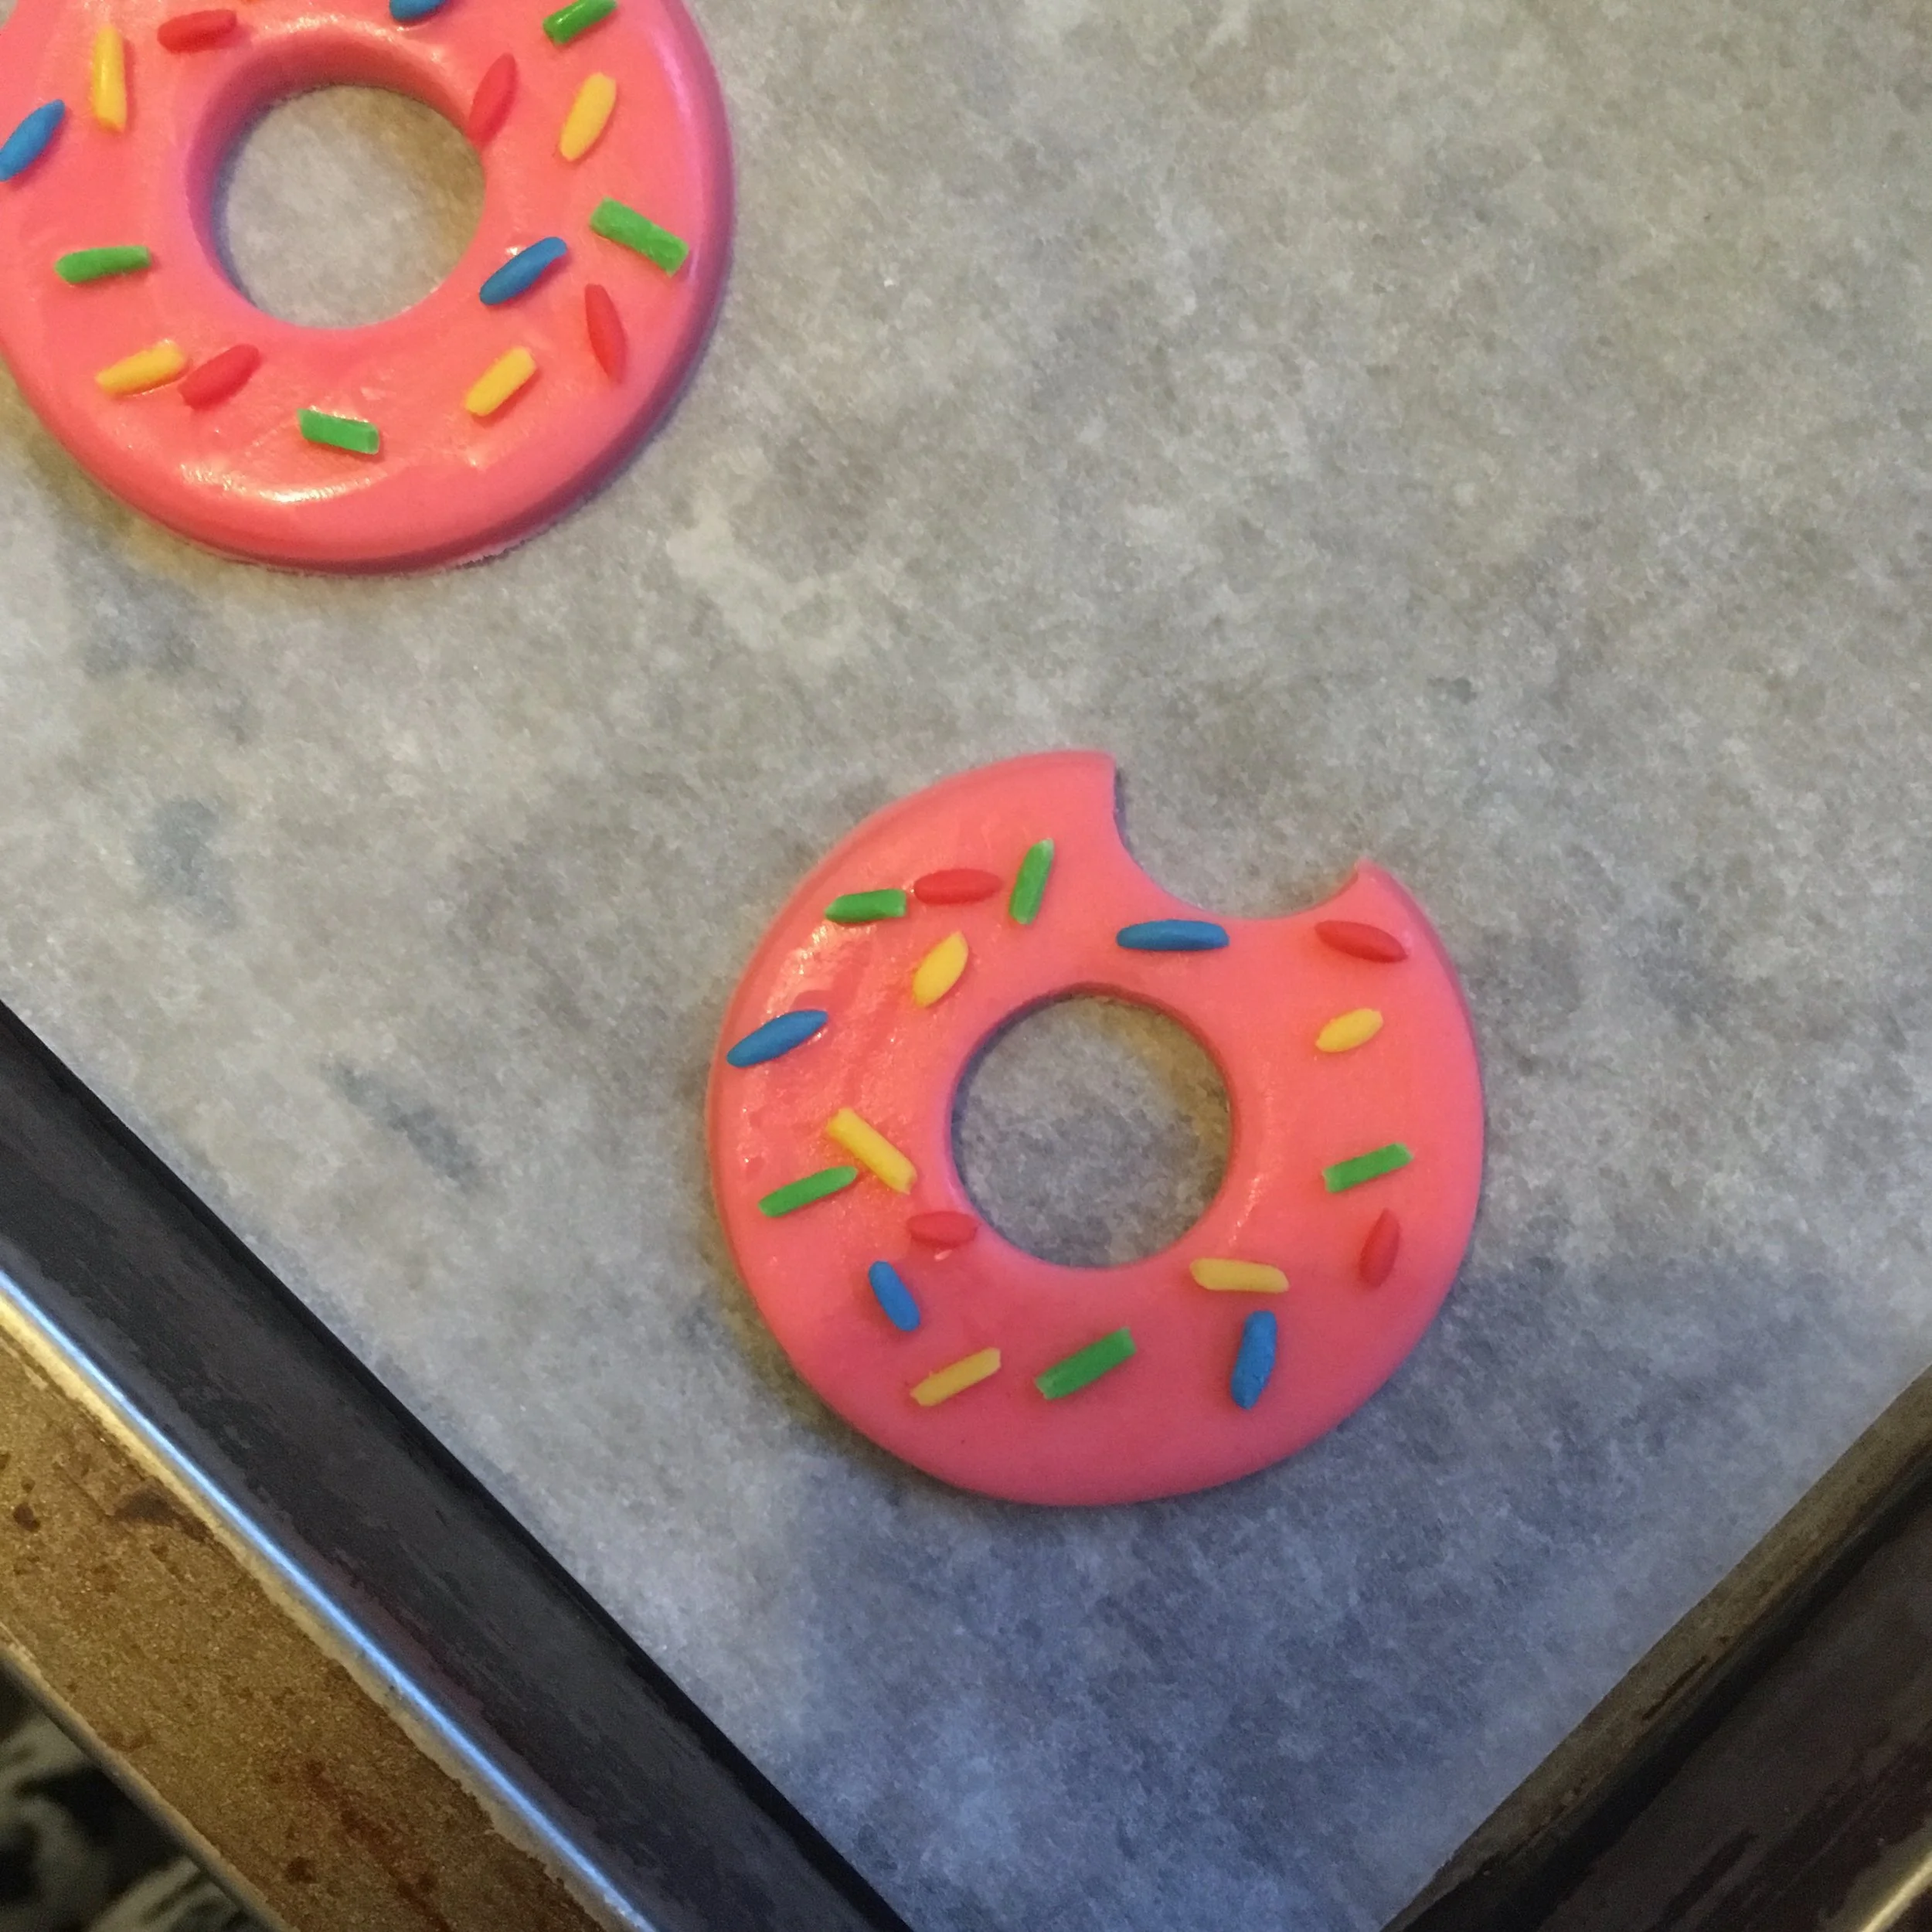
Sprinkle Donut Cupcake Toppers

Makes 12
You will need
150g pink fondant
150g biscuit coloured fondant
10g each of red, blue, yellow and green fondant
1 small piping nozzle
1 small round cookie cutter
1 food only paintbrush
Instructions
1. Roll out the pink fondant to 2mm thick.
2. Using a small cookie cutter, cut out 12 circles
3. Repeat this for the biscuit coloured fondant.
4. Use the large end of the piping nozzle to cut out small circles from the middle of each of your pink and biscuit circles.

5. Using the same nozzle, cut out a piece from the body of each of the pink donuts, this will be the missing bite.
6. Using your fingers, roll the red, yellow, green and blue fondant into very small, very skinny ropes. These will be our sprinkles so they need to be really skinny.
7. When the ropes are small enough, cut them into mini sprinkle sized lengths and attach to the top of the pink donuts with a little water.

8. Leave the pink and the biscuit donuts to for 30-60 minutes. Letting them dry slightly helps to keep the shapes intact.
9. After they’ve dried a little, moisten the top of the biscuit donuts with a little sugar water and attach the pink donuts on top. Try to have the pink donuts, slightly offset so that the biscuit colour can show through.
10. Use the piping nozzle again to cut out the missing bite this time form the biscuit colour. Try not to cut it completely flush against the pink as this will allow the biscuit to show through better.

11. Leave the toppers to dry completely overnight, flipping over halfway.
12. Place on top of your delicious cupcakes.
Pineapple Cupcake Toppers

Makes 12
You will need
150g yellow fondant
150g of white fondant
50g green fondant
Gel food colouring - green and yellow
1 food-only paintbrush
Parchment paper
Instructions
1. Draw a small pineapple on parchment paper using a pencil (graphite pencils are food safe) and cut this out, it will be your template. I transferred mine to cardboard so it would show better in the pics but you don’t have to.
2. Roll flat the white fondant to 1-2mm thick.
3. Place your pineapple template on top of the white fondant and cut out 12 shapes.


4. Repeat this for the green fondant but this time only cut out the leaves on top not the body of the pineapple. Cut out 24 green pineapple crowns.
5. On half of the green crowns, remove the centre leaf.
6. Attach the crowns to the top of the white pineapple with a little water. First the 12 with the middle leaf intact followed by the set that have the middle leaf removed.

7. It’s best to take a quick moment to refer back to your template and trim off any excess fondant that may have appeared.
8. Now roll flat the yellow fondant to 1-2mm thick. Using your template, cut around only the body this time.
9. Attach this to the white fondant with a little water.
10. Using a sharp knife, score diagonal lines into the yellow section of the pineapple, first in one direction and then the other to make the distinctive pattern

11. Take a sterilised needle and push little holes into the centre of each of the diamonds on the pineapple.
12. Use the needle again to score little indents between each of the leaves on the crown and give them a little more depth.
13. With a food-only paintbrush, mix 2 drops of water with a spot of yellow food colouring and paint this over the yellow part of the pineapples. Concentrate particularly on the lines you scored in earlier.
14. Repeat this technique with green food colouring on the crown part of the pineapple.
15. Leave to dry fully overnight, flipping over halfway through.
16. Pop on top of your cupcake.
Rocket Popsicle Cupcake Toppers

Makes 12
You will need
150g white fondant
100g of red fondant
100g blue fondant
1 food only paintbrush
Parchment paper
Instructions
1. Make the template for your rocket lolly in parchment paper.
2. Roll the white fondant to 1-2mm thickness.
3. With a sharp knife, carefully score lines (careful not to cut all the way through) into the white fondant to split it into 3 equal sections horizontally. The distance between the top and bottom line should be the same as the height of your template.

5. Roll the red fondant to 1-2mm thick and cut it into a strip big enough to cover the top section of one of the rockets. Try to get the bottom edge very straight.
6. Attach the red strip to the top of the white with a little water, lining up the straight edge against the line you scored in earlier.
7. Repeat this for the white strip in the middle and the blue strip along the bottom.

8. Leave the fondant to dry like this for 30-60 minutes to make it easier to trim.
9. After they’ve had time to dry, flip it so that the white side is showing.
10. Line your template up on the white side and cut around to make the popsicles. Repeat until you have 12.

11. Turn the toppers right side up again and use your knife to score 5 vertical lines down each.
12. Leave to dry completely overnight, flipping halfway through.
13. Attach to the top of your chosen cupcake.
And we're done! I'll see you next week for a giant iced gem, it is gonna be spectacular!


